Assigning documents
Last updated: 28/08/2026
Documentation outdated
This section is partially outdated. It is mostly updated in November 2024 but would benefit from refinement. Please get in contact if you would be interested in properly documenting and updating this section.
Once data has been imported and an annotation scheme has been created, items can be assigned to annotators. Users with the appropriate permission see another "Label Manager" entry in the navigation menu with a gear icon. This guide walks you through the process of assigning documents to be annotated by users.
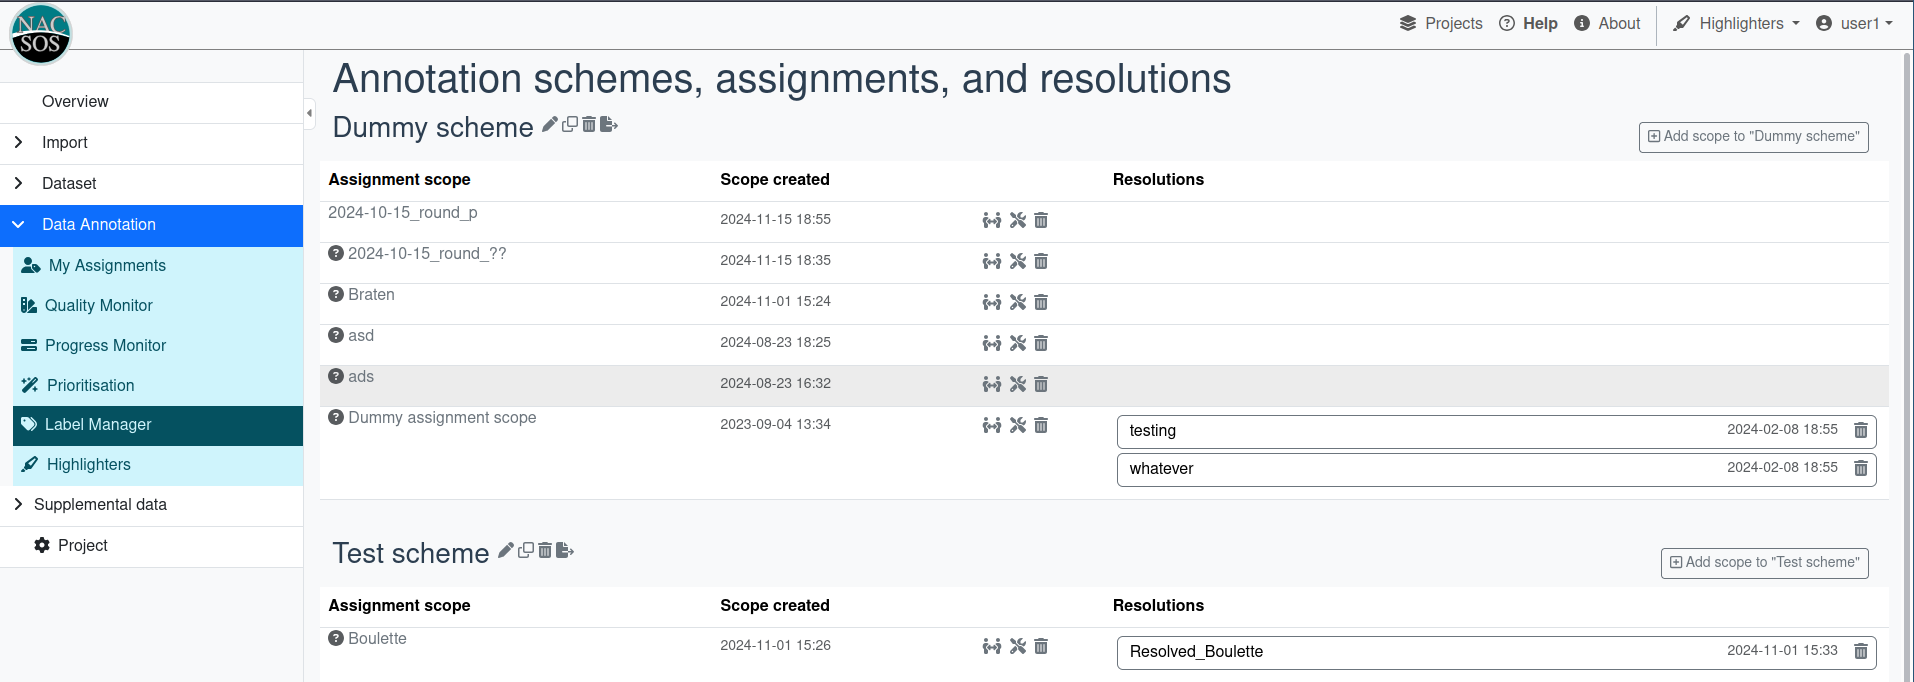
Under Data Annotation -> Label Manager there is a list of all assignment scopes. In the top right corner the button " Add scope to ..." leads to the page where assignments can be created. When starting a project the default Data filter of random sampling should be used. Later assignments can use priority screening described here.
Quick Start⚓︎
Step-by-step guide for creating assignments
- Data Annotation -> Label Manager and click button " Add scope to ..." .
- Define Assignment scope title.
- Follow the system for titles in the project. This might include the consecutive number of the assignment, the date of setting up the assignment, whether it is prioritised or random, the size of the assignment, and name abbreviations of the coders.
- Example: "028_20241202_prioritized_500_JW_DN"
- Assignment settings
- Define Number of assignments per user.
- In Assignment overlap define how many papers should be single or double (or generally multi-) coded and check if this is Plausible.
- In Data filter choose Random sampling for sampling randomly or choose Prioritised sampling and choose the trained model in Prioritised items.
- Offset can be used if creating multiple assignments from one prioritised sample.
- Example: if the first assignment had 300 documents, the second should be offset by 300.
- Press Safe then click the button Make assignment that appeared in the top right corner of the Assignment setting field.
Save before assignment
In theory, you should not be able to make assignments before you saved the configuration. Just to be on the save side, always click save on the top right before you trigger the generation of assignments.
Schemes and scopes screen⚓︎
In order to create assignments for an annotation scheme, click the respective " Add scope to ..." button. For editing or viewing an existing scope, click on the respective icon.
Use concise and descriptive titles!
It might be tempting to not provide titles or leave them at the default value. For your own sanity (and that of colleagues), please take some time to come up with a descriptive and concise title for each assignment scope. For example "Test run for training students". Furthermore, the scope description is shown in the annotation interface, thus you may want to provide what annotators should look out for specifically in this assignment scope. The description can also be used to keep notes on this scope for yourself in order to keep the title more concise.
Assignment scope config screen⚓︎
The configuration screen has three sections. In the top section, you can specify a title and description for this scope. In the middle section, you define how assignments will be distributed. Once you created assignments, you can monitor the progress or edit assignments in the third section.
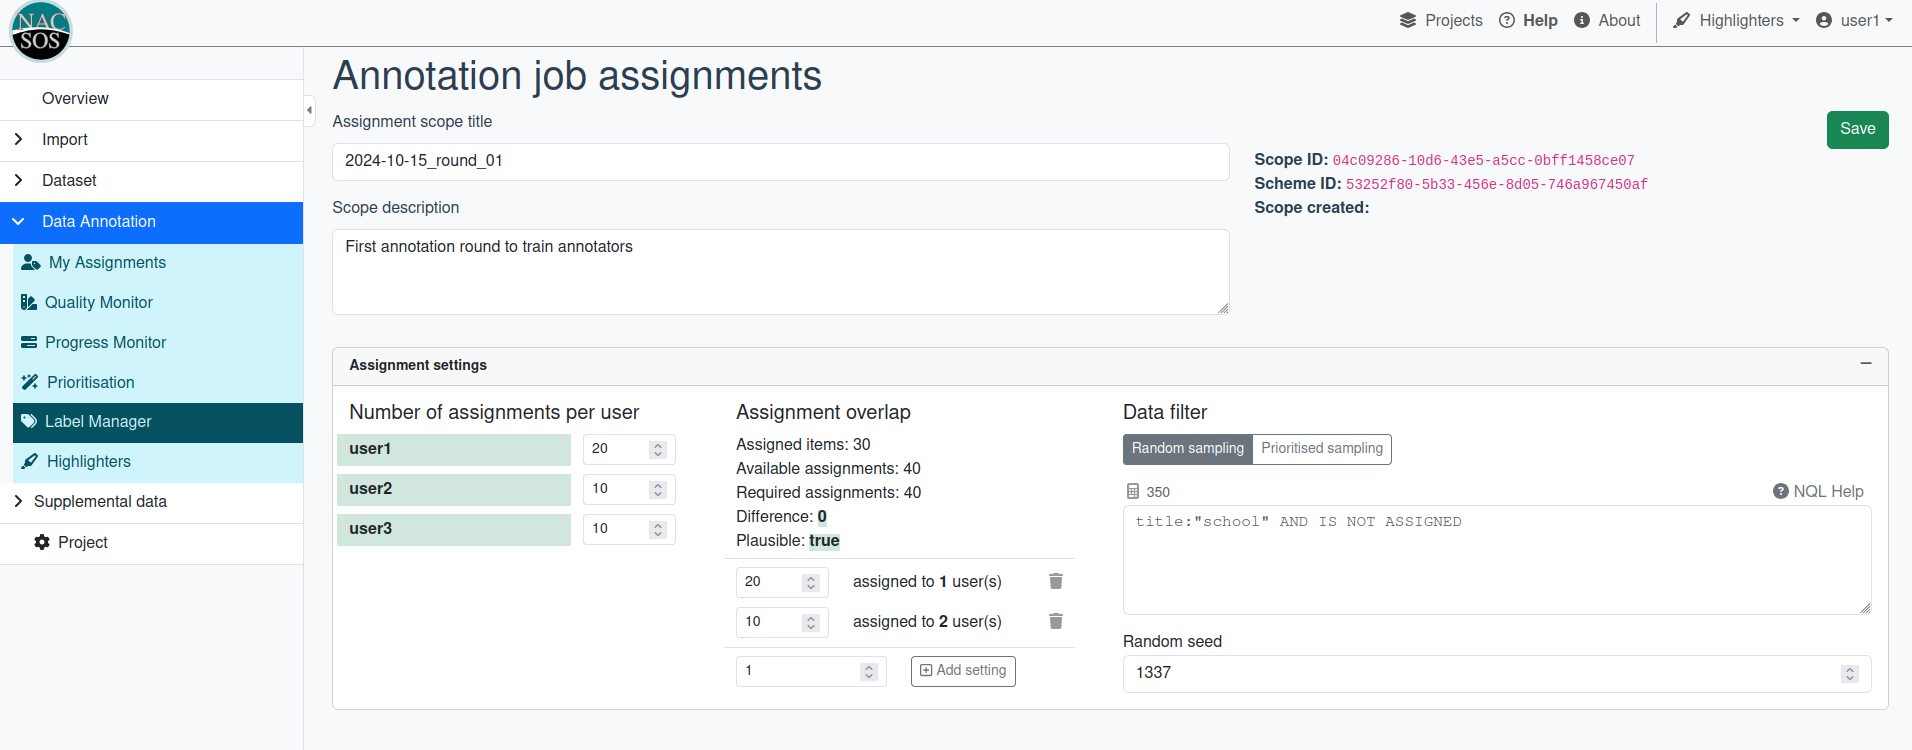
The assignment settings have three columns. In the first column, you can decide how many assignments each user should get. Usually, everyone would get the same number of assignments. Leave at 0 if that user should not get any assignment.
In the second column, you can specify for how many items you would like an annotation by more than one annotator ("multi-coding"). Typically, we double-code everything. This means that each item is seen by exactly two people. When all annotators are in perfect agreement later on, it might make sense to single-code the vast majority of items with only a few overlapping assignments. The number listed will help you find a valid configuration. Note, that there is no error if the user pool can be too big, but assignments will fail when you try to assign to many papers to too little user capacity. Note also, that these numbers and the plausibility checker are not a guarantee that you created a valid configuration. Due to the way the algorithm works, there are cases where there would be a possible way to distribute assignments, but we did not find that optimal distribution.
In the third column, you can set up the method of sampling (random vs priority), and the pool of items to sample from. This sample might be drawn at random from the entire project if the query box is left empty or from the filtered set. Alternatively, assuming you already have a ranked list of prioritised items, you can sample from that ranking. The algorithm will then take the first N items (and keep the order in the assignments) from that list starting at the specified offset. There are no additional checks, it's up to you to ensure that the "item pool" is large enough to fit the numbers in the columns to the left.
Assignment scope progress / status⚓︎
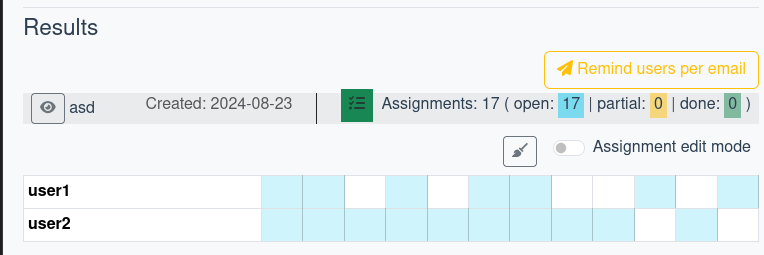
Once an assignment has been created, at the bottom of the page, you can see the Results section. Clicking on the button (in the image highlighted green), you can see the progress/status of assignments.
This section allows you to monitor the progress and see how assignments to documents is spread across users. Not all details are loaded by default, because it could potentially contain a lot of information. Note, that the detail view is work-in-progress and currently more targeted for smaller sets of documents (fewer than 20).
Each row in the table corresponds to a user from the pool. Each column corresponds to a document that has at least one assignment in this scope. An empty (white) cell indicates no assignment for that user-document pair. Coloured cells indicate assignments, whereas blue means "open" (to-do), yellow means "partial" (incomplete annotation), and green means "done". Above that table, you get a summarised statistic of all assignments in this scope.
Edit assignments⚓︎
You may wish to transfer assignments to someone else or edit who should annotate what. You can do this at the same view for assignment scope progress/status, under Results section.
By clicking the "brush" icon, all blue cells will be dropped (you may need to refresh the page to see the result).
Alternatively, you can activate the edit mode. If you click on a white cell, you create an assignment for that user/item. If you click on a blue cell, you drop that assignment. You cannot click on yellow/green cells, as there are already annotations for that assignment, so it would be too dangerous to delete.
Caveat: In some cases, you may have specified a specific order. This order might have varied for each user, the table orders the items (columns) by first occurrence for any user. When editing (particularly creating assignments), the order will be stored as the column number. It might very well be, that this will affect the order in which the user sees this item (for various reasons beyond the scope of this documentation). If the order is critical in your use-case, make sure this feature does not affect it.
Further notes⚓︎
The database schema and logic behind it does not require any assignments for an annotation. For example, you could just import annotations from elsewhere and don't need to create a respective assignment first. Consider this to be an information for advanced usage.
It is safe to edit the title and description even after assignments have been made. Theoretically, changing the configuration should be disabled, but if it isn't for some reason, do not edit those to prevent inconsistencies!